How to create and manage your templates
Template Feature
Mary Smith
Last Update setahun yang lalu
As you start growing with Kaydoh, you will start accumulating websites.
Kaydoh has a template feature that will help keep your sites organized and manage master sites you want to maintain.
What do you need?
- Your computer
What to do?
- Watch Tutorial ( 3:30 minutes)
- Read Tutoril ( step by step)
Watch - Tutorial ( 3:30 minutes )
Read - Tutorial ( step by step )
STEP 1
Our template library is divided into two tabs at the moment. The Main tab and the Kaydoh tab. The Kaydoh tab is where you'll find standard templates to freely use and copy to edit for your own business.

STEP 2
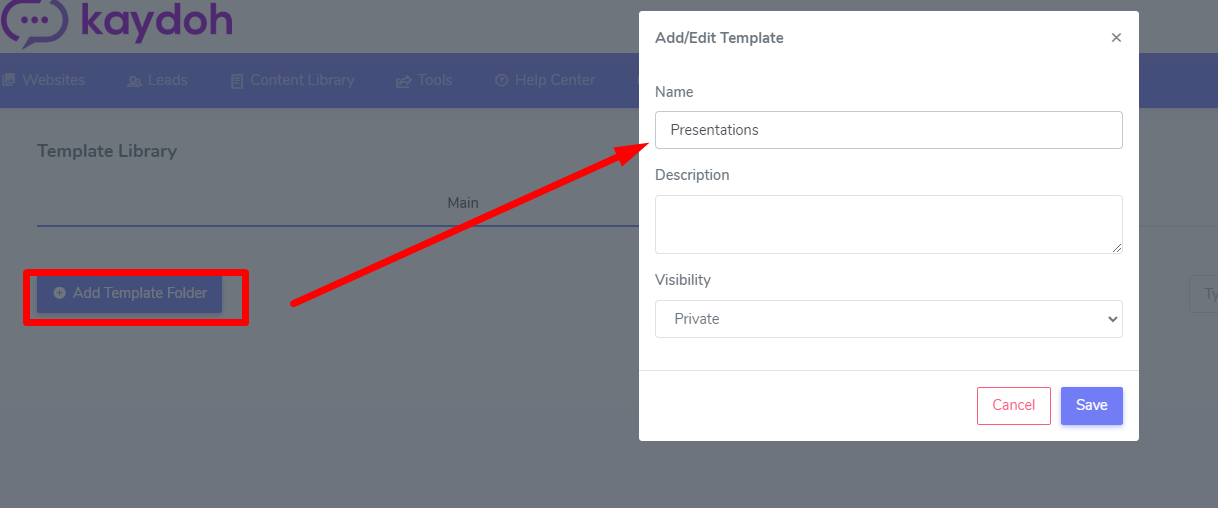
Navigate to the "Main" tab to create your template folder before you can add websites to it. Click on "Add Template Folder". Input the appropriate title and description that will help keep your folder organized and easy to remember. For example if you have Kaydoh websites for Listing Presentations, Home Buyer Presentations, Investor Presentations, then you'll want to have a folder named, "Presentations". You'll then be able to grab all of your websites and add them to the designated folder accordingly in the following steps.
STEP 3
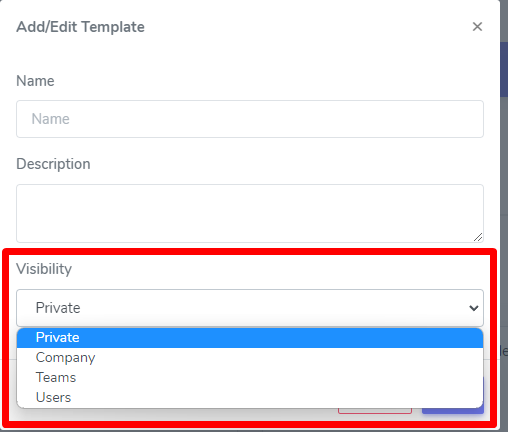
When creating a folder, you have the options on the visibility of the folder and how it's shared withing your account that may have other agents included. Below are the definition of each visibility option:
- Private
The "Private" option is the default selection. It makes your folder private. Only the Owner of the Kaydoh account or your team leader can view your private folder. - Company
Setting the visibility to "Company", will share your folder to the entire set of Users within your Kaydoh account. This means all team members will be able to see and use this folder. Think of this as the general "Public" folder. - Teams
Setting the visibility to "Teams", will let you share the folder to teams you belong to. This means everyone who is part of your team will be able to see and use this folder. - Users
Setting the visibility to "Users", will let you specifically share this folder to individual Users within your Kaydoh account.
STEP 4
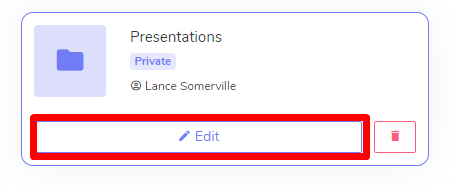
You can edit your folder by just clicking on the EDIT button accordingly and saving your changes.
STEP 5
To add a website to your folder, just navigate to the main view of your dashboard of websites.

STEP 6
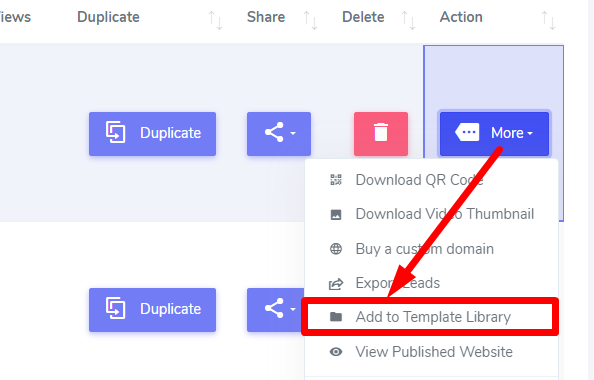
Find the website you want to add. Click on the "MORE" button and find the option "Add to Template Library"
STEP 7
A list of eligible folders to add websites to will display itself.
Choose a folder accordingly and click on the (+) icon.
The website will be added to the folder instantly.

STEP 8
To view the folder quickly, click on the link displayed inside the confirmation message.

STEP 9
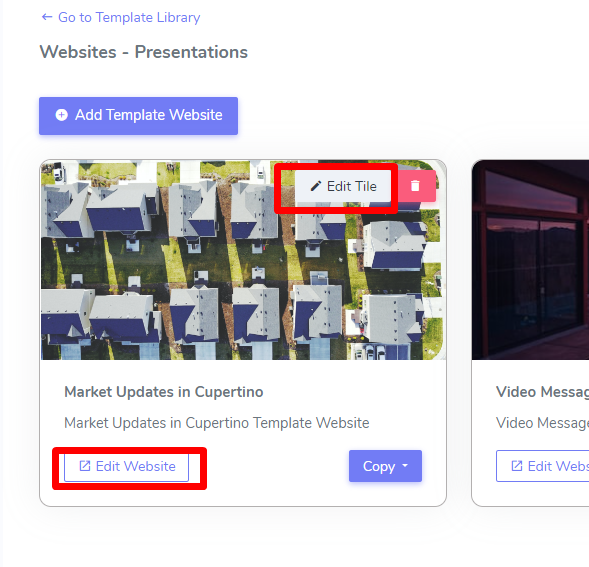
To manage a website inside a template folder find the "Edit Website" button.
If you are the owner of the website, you will be able to edit it directly.
If you need to modify how the website tile looks inside your folder, click on the "Edit Tile" button.
Keep in mind, "Edit Tile" only edits what you see at a tile level. It does not actually edit the website. To do that you will need to click on "Edit Website"
LAST STEP - Using the template website.
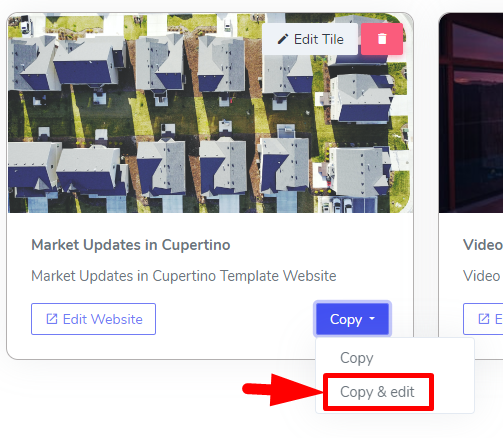
When using the template website, navigate to the template folder. Select the website you need to use, and choose between the following options:
- Copy
This copies the website back into your personal account to edit at a later time. Use this action when you need to copy multiple websites and don't need to edit them right away. - Copy & Edit
This action copies a website back into your website dashboard and immediately edit the site directly. This is best used when you have a specific campaign that you want to work on right away.
Internal tags
How to add template websites
how to manage your template folders
how to manage your templates
how to manage template
how to create template
how to create template website
main template
kaydoh template
copy and edit tenplate
copy template
How can I create and manage my templates?
What are the steps to set up and organize templates?
How do I build and edit my templates?

